Understanding Resin Pour Techniques for River Tables
Creating a river table is an artistic process that combines the natural beauty of live edge wood with the fluidity and transparency of resin. This section will delve into the basics of how resin pour techniques enhance the aesthetics of your timber, making it look as if water flows through its veins.
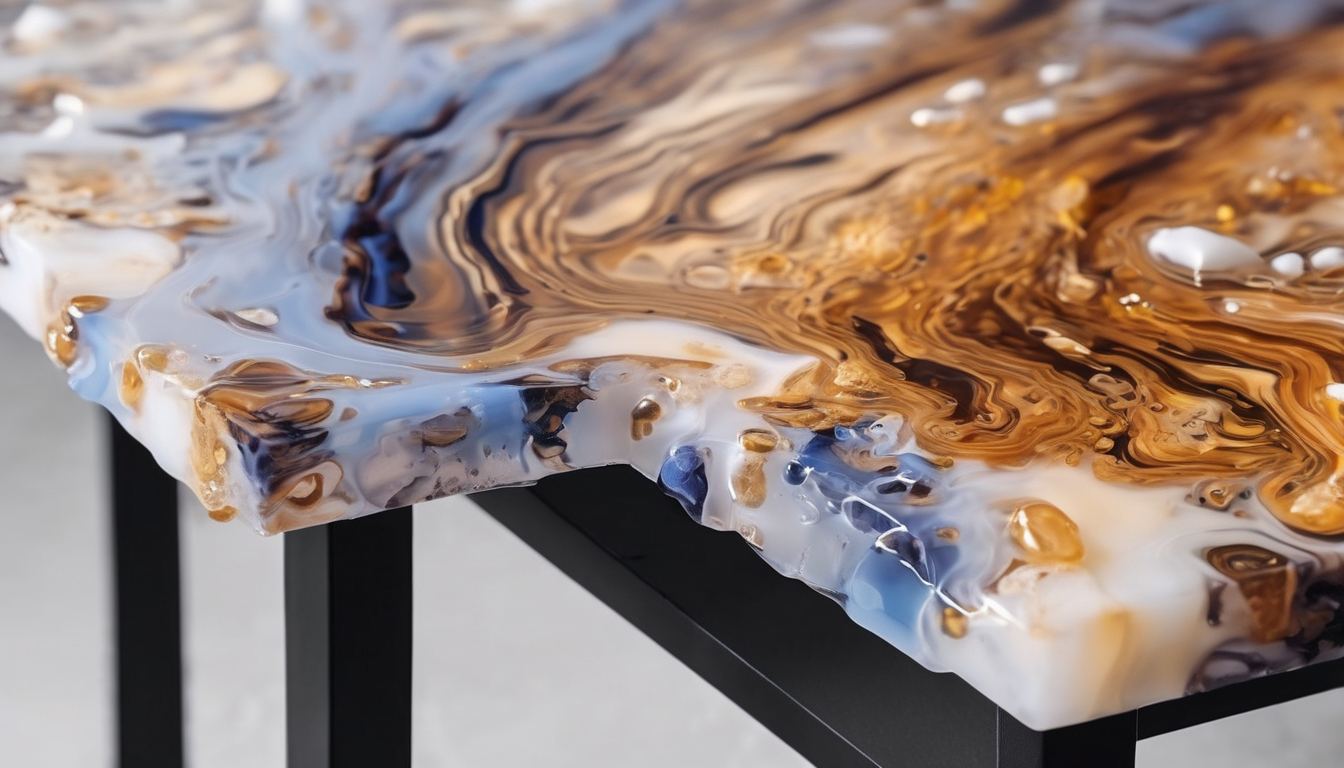
To begin, understand that the key to achieving realistic rivers in a table is layering materials and carefully pouring resin to mimic natural water patterns. Techniques such as using basalt chips or creating gradients can add depth and realism to your design. Additionally, consider the wood’s grain direction and colour when planning where to place these elements for maximum effect. This relates directly to Resin Pour Techniques For River Tables.
Resin Pour Techniques For River Tables: Choosing the Right Materials
The success of a river table largely depends on selecting high-quality materials that complement each other perfectly. Start by choosing a live edge slab with unique grain patterns and knots, which will serve as the foundation for your design. Next, pick a clear resin that is food-safe if you plan to use the table in a kitchen setting.
For adding texture and realism to your rivers, consider using basalt chips or fine sand mixed into the resin. These materials help capture light and create a reflective surface similar to water. Additionally, ensure you have enough hardeners and catalysts for multiple pours, as this process often requires several layers of resin to achieve desired effects.
Resin Pour Techniques For River Tables: Preparing Your Workspace and Equipment
Before embarking on your river table project, it’s crucial to set up a clean, well-ventilated workspace. Cover surfaces with drop cloths or plastic sheets to protect them from spills and dust. Ensure you have all necessary tools at hand, including mixing cups, stir sticks, gloves, safety glasses, and respirators.
Organise your equipment by placing resins, hardeners, catalysts, and other materials within easy reach but away from any heat sources that could cause premature curing. Prepare a workbench or table where you can lay out the live edge slab and apply resin evenly without it spilling over edges.
Applying a Basalt Layer for Realism
One of the most effective techniques to create realistic rivers in your river table is using basalt chips. Start by mixing small amounts of clear epoxy resin with hardener and catalyst according to manufacturer instructions. Place these mixtures into separate containers.
Next, carefully apply a thin layer of resin over areas designated as ‘rivers’ on your live edge slab. Sprinkle basalt chips onto the wet resin surface, gently pressing them down but not embedding too deeply. Allow this layer to cure partially before removing excess chips with a soft brush or cloth. When considering Resin Pour Techniques For River Tables, this becomes clear.
Pouring the Resin Accurately
Accurate pouring is essential in achieving smooth and even resin layers that enhance your table’s natural beauty. Begin by mixing larger quantities of clear epoxy resin with hardener and catalyst, ensuring thorough blending before use.
Pour small amounts at a time to avoid air bubbles forming during curing. Use a paintbrush or spatula to spread the resin evenly across designated areas without overfilling gaps between wood grain lines. Work quickly but methodically, allowing each layer to cure partially before applying subsequent coats for depth and clarity.
Finishing and Polishing Your River Table
Once all layers of resin have cured completely, it’s time to finish your river table by sanding down any rough edges or excess material. Start with coarse grit paper (80-120) and gradually move up through finer grits until the surface feels smooth under your hand.
Polishing further enhances the table’s appearance by reducing reflection points on resin surfaces, making them appear clearer and more glass-like. Use a polishing compound designed for wood and resin finishes applied with a soft cloth or buffer machine set to low speed settings.
Expert Tips for Perfect Results
1. Choose the Right Wood: Opt for live edge slabs with pronounced grain patterns and interesting features like knots, which provide natural accents for your river design.
2. Mix Resin Precisely: Accurate measurements of resin components are crucial to prevent unwanted curing issues or inconsistencies in appearance.
3. Vary Pour Speeds: Adjust pour speeds based on resin viscosity and ambient temperature; faster pours can introduce more air bubbles, while slower ones may cause premature setting.
4. Experiment with Colors: Incorporate pigments or metallic effects to create unique visual effects within your river table’s design.
5. Handle Carefully During Curing: Avoid moving the table excessively during resin curing stages as this can disrupt layers and affect final appearance. The importance of Resin Pour Techniques For River Tables is evident here.
FAQ About Resin Pour Techniques
- Q: Can I use water instead of resin?
-
A: While water might seem like a natural substitute, it does not offer the durability or clarity required for a long-lasting river table. Clear epoxy resins are specifically designed to enhance wood’s beauty while providing structural integrity.
- Q: How do I fix air bubbles in my resin?
-
A: To address air bubbles, use heat guns or torches carefully to help them rise and pop during the curing process. Alternatively, applying a thin coat of resin on top can seal these imperfections once cured.
- Q: What’s the best way to maintain my river table?
-
A: Regular dusting with a soft cloth is sufficient for maintenance. Avoid using harsh chemicals or abrasive cleaners that could damage the finish over time. Understanding Resin Pour Techniques For River Tables is key to success in this area.
