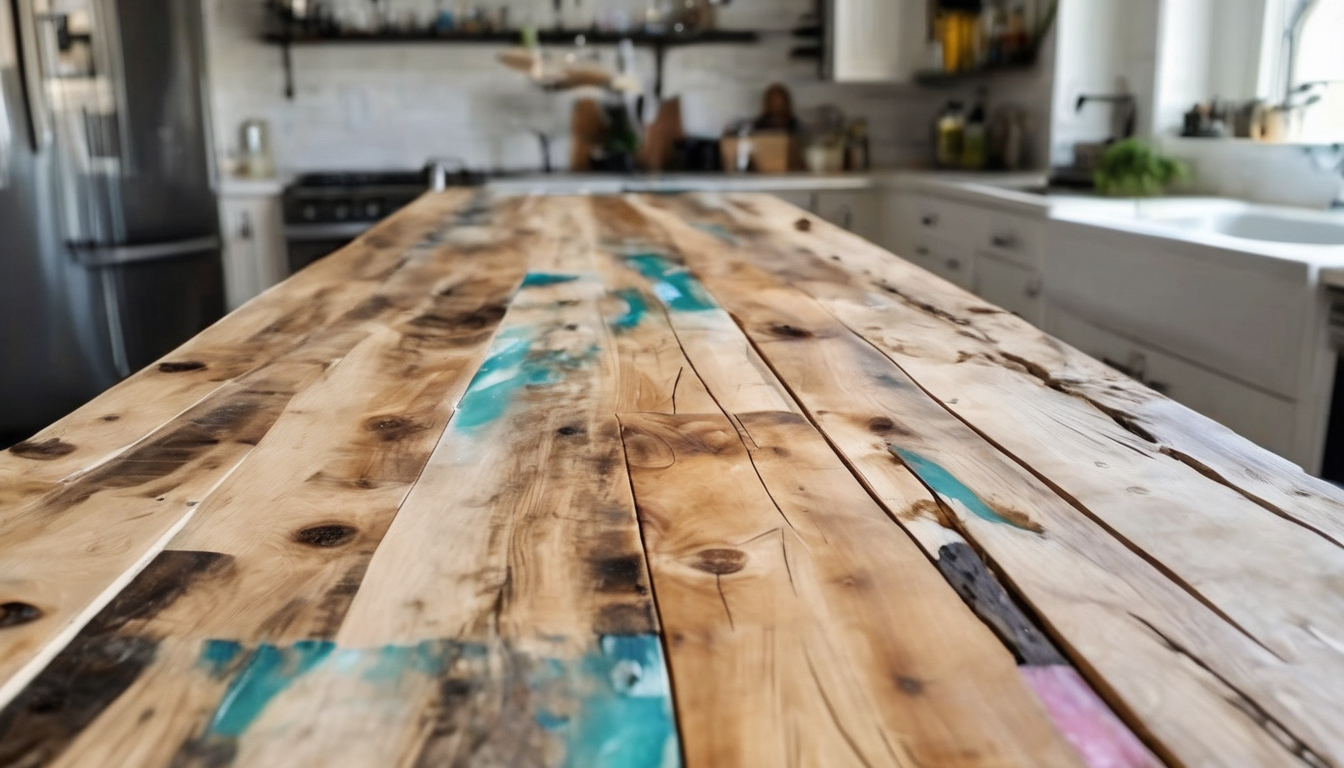
Transforming pallet wood into stunning epoxy resin countertops offers Bristol homeowners a budget-friendly way to achieve professional results. How to Prepare Pallet Wood for Epoxy Resin Countertops is the critical first phase, ensuring adhesion, durability, and a food-safe finish for high-traffic kitchens. As a master carpenter in Bristol, I’ve crafted countless resin-inlaid surfaces, from live-edge breakfast bars in Somerset cottages to custom islands in Gloucestershire period homes.
Pallet wood’s rough character pairs beautifully with clear epoxy, but poor preparation leads to bubbles, delamination, or uneven cures—costly mistakes in damp South West climates. This guide details every step, drawing from hands-on experience and reliable sources like UltraClear Epoxy and Super Epoxy Systems.[4][3] Follow these methods to create countertops lasting decades, perfect for families in Bournemouth or Exeter needing practical, eye-catching upgrades.
Why Proper Preparation Matters for Epoxy Resin Countertops
Pallet wood arrives dirty, warped, and full of contaminants that sabotage epoxy adhesion. In Bristol’s humid conditions, untreated pallets absorb moisture, causing bubbles during the pour.[5] Skipping how to prepare pallet wood for epoxy resin countertops risks a £200-£500 rework.
Preparation creates a stable base, seals porous end grains, and reveals the wood’s natural grain for that river-table effect popular in Cornwall kitchens. Sources confirm sanding to 220 grit and sealing prevents air pockets.[4][2] Result: a glossy, food-safe surface handling daily chops in Wiltshire family homes.
Essential Tools and Materials: How to Prepare Pallet Wood for Epoxy Resin Countertops
Gather these for success. Budget: £150-£300 total, sourcing pallets free from local Bristol warehouses.
- Crowbar, hammer, pry bar for dismantling.
- Table saw or circular saw, planer, jointer for milling.
- Sandpaper (80, 120, 220 grit); orbital sander.
- Food-safe epoxy for fills (e.g., UltraClear); brushes, syringes.[4]
- Wood glue (PVA), clamps; black paint for gaps.[1]
- Protective gear: gloves, goggles, respirator; dust extraction.[3]
Cost Breakdown for South West UK DIYers
| Item | Approx. Cost (£) |
|---|---|
| Sander rental (1 day) | £25.00 |
| Epoxy filler kit (1L) | £40.00 |
| Sandpaper assorted | £15.00 |
| Clamps (set of 6) | £50.00 |
These ensure precise how to prepare pallet wood for epoxy resin countertops, avoiding shortcuts that crack under heat from hot pots in Dorset homes.[3]
Step 1: Sourcing and Selecting Pallet Wood
Hunt heat-treated pallets (HT stamp) from Bristol industrial estates or Plymouth suppliers—avoid chemically treated ones for food safety. Select straight oak or pine planks, 15-20mm thick, free of heavy rot.[1][5]
Inspect for nails, staples; twist-test for warp. Aim for 2-3 pallets yielding 2m² countertop. In Gloucestershire’s variable weather, store indoors to stabilise at 15-20°C.[2]
Step 2: Dismantling and Cleaning Pallet Wood
Use a pry bar to gently remove slats, preserving length. Hammer out nails with pliers; wear gloves to avoid splinters. Pressure wash or scrub with sugar soap, then dry fully (1-2 weeks).[3]
Remove paint/stains via wire brush or heat gun. This initial clean is vital in how to prepare pallet wood for epoxy resin countertops, preventing contaminants bubbling up in Somerset kitchens.[1]
Pro Tip: Char for Depth
Lightly torch surfaces for a charred effect, as in epoxy table builds—enhances grain visibility under resin.[5]
Step 3: Milling and Jointing Pallet Wood for Flat Surfaces
Rip planks to uniform width (e.g., 100mm) on table saw. Plane to 18mm thick; joint edges straight for tight glue-ups.[2] Lay herringbone or butcher-block pattern on plywood base, painted black underneath.[1]
Glue with PVA, clamp overnight. Flatness is non-negotiable in how to prepare pallet wood for epoxy resin countertops—warps cause uneven epoxy depth, pooling in Exeter holiday homes.[4]
Step 4: Filling Voids and Repairs Before Epoxy Pour
Chisel glue squeeze-out; identify knots, cracks. Mix thin epoxy (1:1), syringe into voids; cure 24hrs then sand flush with 80 grit.[2] For rot, splice fresh timber or consolidate with thickened epoxy.[3]
This pre-fill in how to prepare pallet wood for epoxy resin countertops minimises deep pour needs, saving £50+ on resin for Cheltenham projects.
Step 5: Sanding and Sealing – Key to How to Prepare Pallet Wood for Epoxy Resin Countertops
Progress: 80 grit (flatten), 120 (smooth), 220 (fine). Vacuum dust thoroughly—critical for adhesion.[4] Seal all surfaces, especially ends, with thin epoxy brush coat; cure 48hrs.[5][6]
Thirsty pallet end grains suck up resin, causing bubbles. Sealing locks char/dust, ensuring bubble-free floods in high-use Swindon counters.[1]
Sanding Schedule
- 80 grit: 10 mins/side – remove high spots.
- 120 grit: 5 mins – level joints.
- 220 grit: 10 mins – baby-skin smooth.
Step 6: Final Inspection and Setup for Pouring
Tape edges with painter’s tape; build 20-30mm dams from melamine/plywood, sealed with silicone. Level on sawhorses; check for dust-free shine.[3] Ambient temp: 20-25°C, low humidity.
Last sweep confirms perfection in how to prepare pallet wood for epoxy resin countertops. Now ready for 2-3mm flood coats using food-safe resin like TotalBoat.[7]
Common Mistakes When Learning How to Prepare Pallet Wood for Epoxy Resin Countertops
Rushing drying: Wet wood steams bubbles. Skipping seal: End grains foam. Uneven joints: Epoxy puddles. Dust contamination: Hazy finish.[4][5]
In Bristol’s damp, acclimate wood 2 weeks. Always over-prep—better safe than sanding cured resin.
Expert Tips from a Bristol Carpenter
- Use black paint under gaps for hidden flaws.[1]
- Deep pour first, tabletop epoxy topcoat for durability.[5]
- Test resin on scrap pallet—match brands for compatibility.
- For river effects, route shallow channels pre-seal.
- Food-safe only: Check certifications for kitchen use in Cornwall.
I’ve built 20+ pallet-resin tops; sealing twice yields glass clarity. Reference UltraClear guides for ratios.[4]
Conclusion: Master How to Prepare Pallet Wood for Epoxy Resin Countertops
Mastering how to prepare pallet wood for epoxy resin countertops unlocks durable, bespoke beauty for under £300. From sourcing in Gloucester to final seal, each step builds success. Your Bristol kitchen deserves this upgrade—start dismantling today for a heirloom surface.
Follow these 6 steps precisely for flawless results, avoiding pitfalls I’ve seen ruin projects. Pair with food-safe pours for safe, stunning countertops in the South West. Understanding Prepare Pallet Wood For Epoxy Resin Countertops is key to success in this area.
