Introduction to Filling Cracks in Wood with Epoxy Resin Step by Step
Understanding Fill Cracks In Wood With Epoxy Resin Step By Step is essential. Filling cracks in wood is a common repair task that can significantly enhance the aesthetics and durability of wooden items. One of the most effective materials for this purpose is epoxy resin, known for its strength and versatility. This guide will walk you through eight simple steps to fill cracks in wood with epoxy resin, ensuring a professional finish that extends the life of your wooden furniture or structures.
Understanding How to Fill Cracks in Wood with Epoxy Resin Step by Step
Filling cracks in wood is crucial for maintaining the integrity and appearance of wooden items. By using epoxy resin, you can achieve a strong and durable repair that blends seamlessly into the surrounding material.
Why Use Epoxy Resin?
Epoxy resin provides an excellent bonding agent due to its high strength and flexibility. It can withstand environmental factors like moisture and temperature changes better than many other materials, making it ideal for long-term repairs in a variety of environments across Bristol and the surrounding regions. This relates directly to Fill Cracks In Wood With Epoxy Resin Step By Step.
Fill Cracks In Wood With Epoxy Resin Step By Step – Preparation for Filling Cracks with Epoxy Resin Step by Step
Before you start filling cracks, ensure that your workspace is clean and well-lit. Gather all necessary tools and materials to avoid interruptions during the process.
Gathering Essential Tools and Materials
- Epoxy resin kit with separate hardener components
- Protective gloves, goggles, and a respirator mask
- A stir stick or mixing pot
- Sandpaper (various grits)
- A clean rag or cloth
- A heat gun or hairdryer for curing the resin
Selecting the Right Epoxy Resin and Hardener for Your Project
Choosing the right epoxy resin is crucial to achieving a successful repair. Different types of resins are suitable for various applications, such as high-strength bonding or clear finishes. When considering Fill Cracks In Wood With Epoxy Resin Step By Step, this becomes clear.
Types of Epoxy Resins Available in Bristol
- Two-part epoxy systems: These consist of a resin and hardener, which when mixed together form a strong bond
- One-component epoxies: Pre-mixed kits that are easier to use but may offer less control over the curing process
- Clear or pigmented resins: For aesthetic repairs where appearance is important
Considering Environmental Factors in Your Selection
Select a resin that can withstand local weather conditions, such as dampness and temperature fluctuations. In Bristol, it’s essential to choose a product that offers resistance to moisture.
Preparing the Surface Before Applying Epoxy Resin Step by Step
A clean surface is vital for achieving a strong bond. Follow these steps to prepare the area around the crack: The importance of Fill Cracks In Wood With Epoxy Resin Step By Step is evident here.
Cleaning and Sanding the Affected Area
- Remove any dirt, dust or debris from the crack using compressed air or a vacuum cleaner.
- Sand the edges of the crack with fine-grit sandpaper to create a smooth surface for bonding.
- Use rubbing alcohol to clean the sanded area, ensuring it is free from oils and residue.
Safely Handling Epoxy Resin
Epoxy resin can be harmful if not used correctly. Always wear protective gear like gloves and a mask when handling epoxy resin or hardener to avoid skin irritation or inhalation of fumes.
Mixing and Dosing Your Epoxy Resin Correctly for Crack Filling
Proper mixing is crucial to achieve a uniform consistency. Follow the manufacturer’s instructions for dosing ratios.
Measuring the Required Amounts Precisely
- Determine the volume of epoxy resin needed based on the size and depth of the crack.
- Mix equal parts (by weight) of resin and hardener in a clean, dry container.
- Stir the mixture thoroughly until it is free from streaks or lumps.
Ensuring Proper Mixing Techniques
Avoid overmixing as this can introduce air bubbles. Use a stir stick to mix in small circles, ensuring all parts of the epoxy are evenly combined.
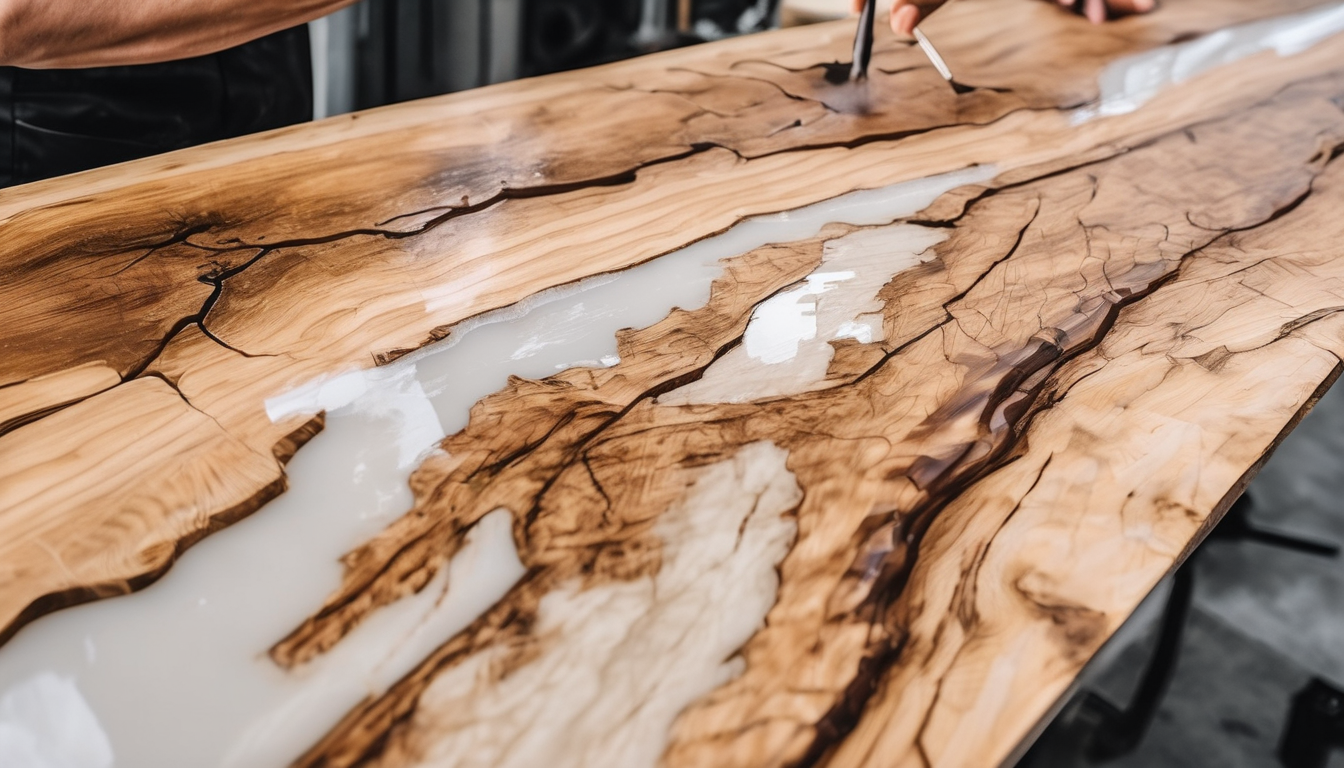
Applying the Epoxy Resin to Fill Cracks in Wood Step by Step
Once your surface is prepared and the resin mixed, it’s time to apply the epoxy.
Squeezing Out a Small Amount of Epoxy for Testing
- Squeeze out a small amount on scrap wood to test the viscosity and cure time.
- Ensure that the epoxy flows smoothly into the crack without dripping excessively.
Filling the Crack with Epoxy Resin Step-by-Step Guide
- Apply a thin layer of epoxy to one side of the crack using a disposable brush or spatula.
- Allow this layer to partially cure before applying additional layers, ensuring good adhesion between each layer.
Finishing and Polishing After Filling Cracks with Epoxy Resin
Once the epoxy has cured fully, it’s time to finish and polish your repair for a seamless look.
Sanding Down Excess Resin Smoothly
- Begin with coarse grit sandpaper (e.g., 80-grit) and work your way up to finer grits.
- Use a random orbital sander for large areas or fine-grit paper wrapped around a block for smaller, more precise areas.
Polishing the Finished Surface to Perfection
- Apply automotive polish using a soft cloth and buff out any remaining marks or scratches.
- Ensure that the finished surface is free from dust and fingerprints before applying the final coat of polish.
Troubleshooting Common Issues During the Repair Process
Sometimes, despite careful preparation and application, issues can arise. Here are some common problems and solutions:
Addressing Air Bubbles in Epoxy Resin
- Use a heat gun or hairdryer to warm the epoxy, causing air bubbles to rise to the surface and pop.
- Alternatively, you can apply additional layers of resin to cover any remaining bubble areas once the initial layer has cured partially.
Solving Issues with Epoxy Not Bonding Properly
- Ensure that both surfaces are clean and free from oils or other contaminants before applying the epoxy.
- Check for correct mixing ratios and ensure proper curing time according to manufacturer guidelines.
Expert Tips for Filling Cracks with Epoxy Resin Step by Step
Here are some expert tips to help you achieve the best results when filling cracks in wood:
- Always use a clear epoxy for repairs where appearance is important.
- Practice your technique on scrap pieces before working on valuable items or surfaces.
- Work in small batches and keep the remaining resin cool to maintain viscosity.
FAQ Section on Filling Cracks with Epoxy Resin Step by Step
Frequently asked questions about filling cracks in wood with epoxy resin:
- Q: Can I use any type of epoxy for this repair?
- A: No, you should choose a two-part epoxy specifically designed for bonding and filling.
- Q: How long does it take for the epoxy to cure completely?
- A: The curing time can vary depending on the brand and environmental conditions but typically ranges from 24 to 72 hours.
- Q: What should I do if the epoxy overflows during application?
- A: Use a clean cloth or paper towel to wipe off excess resin before it cures. Allow any remaining resin to cure and sand down afterwards.
Understanding Fill Cracks In Wood With Epoxy Resin Step By Step helps with this aspect.
Conclusion on How to Fill Cracks in Wood with Epoxy Resin Step by Step
Filling cracks in wood using epoxy resin is a valuable skill for both DIY enthusiasts and professionals. By following these eight steps, you can ensure that your repairs are not only strong but also visually appealing. Remember to always wear protective gear, prepare the surface thoroughly, and mix the epoxy carefully. Understanding Fill Cracks In Wood With Epoxy Resin Step By Step is key to success in this area.
